Saturday, December 10, 2011

Birchbox-December 2011

Birchbox December 2011 Holiday Box

Just recieved my very first Birchbox. Get yours here
Was super excited to receive it.
Checkout the video and photos below

Swatch of the Birchbox Pink by Jouer

Get your own Birchbox by clicking this link


Tuesday, December 6, 2011

Holiday Nails 2011

Quick Tutorial on These Nails
Picked up the ORLY brand at Sally Beauty. They are running a special this week, 12/4. 
Buy two colors get a treatment for FREE.

I picked up these two colors.

Start with a Base Coat. 

If you use this brand you only need one coat.

One coat of a sparkly or glitter polish.

 Finish with a top coat. 

If you want you can paint snowflakes on your ring fingers.


Saturday, December 3, 2011

Winter Skin Care


Products Used:

Cetaphil Cleanser and Moisturizer Normal to Dry Skin
$2.00 Off Coupon Here

Clean and Clear PersaGel

Benefit POREfessional

Benefit Erase Paste

Neutrogena Health Skin-Nude

E.L.F Bronzing Powder

Maybelline Baby Lips
$2.00 off Coupon Here for Target

Monday, November 21, 2011

NYX on Hautelook Starting Today


Good Morning Beautiful, 

With the holidays approaching this Thursday and most of you enjoying a short work week. I thought I would share a great deal happening at HauteLook starting today and ending on Wednesday. I just discovered this website a few months back and its just amazing. You get wonderful discounted deals from the lasted jeans, makeup, shoes and beyond.

Starting today they have great discounted deals on NYX sets. I have not talked much about these but I would highly recommend them, their Jumbo Eye Pencils are just to die for. A little something about NYX is they are an amazing company that has a large selection and an affordable price. So click of to HauteLook now and get these amazing NYX deals.

NOTE: You will need to be invited via invitation so click the link here for your personal invite from me.

Happy Holidays
Amanda :)

Sunday, November 6, 2011

Penny Pinch Beauty Tip : Homemade Lip Balms

Making your own homemade is the best way to ensure your products are safe and helps your wallet. Below are several homemade recipes for LIP BALM.

  If you are not the crafty type or just don't have the time I will be happy to start making these and others products. I will begin selling them for anyone who is interested! Just let me know! :)

  Luscious Lavender Lip Balm Recipe

  • 4 Tbsp jojoba, almond, or olive oil
  • 1 Tbsp grated beeswax or beeswax pearls
  • 1 tsp honey
  • 1/4 tsp vitamin E oil (or 3 punctured, squeezed out liquid vitamin E capsules)
  • 7 drops lavender essential oil (or other essential oil)
  • 1 tsp cocoa powder (optional)
  • 1 tsp colored, natural lipstick (optional, if you want it to have a hint of color)
Warm the oils, beeswax and honey in a small, stainless steel pot or bowl. Be sure to warm it on VERY low heat. (You can use a double boiler, if you’d like.) Stir until the beeswax is completely melted. Remove from heat and quickly whisk in the essential oil, vitamin E, cocoa powder, and colored lipstick. Place the bottom of the bowl into a shallow pan of ice water and continue whisking quickly as you add the honey. Once the honey is incorporated, quickly transfer the balm into your lip balm container (tube or tin) and allow to set for 3 hours.

Coco-Rosey Lip Balm Recipe

  • 2 Tbsp coconut oil
  • 1 Tbsp grated cocoa butter
  • 1 Tbsp dried rosebuds (or any dried flower, green tea, etc.)
  • 1/4 tsp vitamin E oil (or 3 punctured, squeezed out vitamin E capsules)
  • 3 drops rose essential oil (optional, or substitute lavender, vanilla, or sweet orange)
On very low heat, melt the coconut oil in a small stainless steel bowl or pot. After the oil is liquid, add your roses (or other dried flowers) and stir well. Allow to steep (again, on very low heat) for 1 hour. Strain oil into a bowl through a fine-mesh sieve or cheesecloth. Wipe out your original heating pot/bowl, pour oil back in, and return to heat. Add cocoa butter and stir until melted. Remove from heat, add vitamin E oil and essential oil and stir well. Transfer to a small container and let set for 3 hours (or until completely set).

Minty Chocolate Lip Balm Recipe

  • 1 Tbsp grated beeswax or beeswax pearls
  • 1/8 c. coconut oil
  • 1/2 Tbsp shea butter
  • 1/2 Tbsp cocoa butter
  • 1/2 tsp honey
  • 1 tsp cocoa powder
  • 1/8 tsp vitamin E oil (or 2 punctured, squeezed out vitamin E capsules)
  • 3 drops peppermint essential oil
Place the shea and cocoa butters in a small pot or double boiler, and add the coconut oil. Heat over VERY low heat for 20 minutes, stirring occasionally. (Try not to let the mixture go over 175 degrees, or the shea butter could end up a little gritty.) Add the beeswax and stir well. After the beeswax has completely melted, remove the mixture from the heat and add the essential oil, honey, vitamin E, and cocoa powder, whisking well the whole time. After everything is incorporated and smooth, transfer to a lip balm tube or tin and allow to set for 3 hours.
  
Note: You can find the containing jars at Hobby Lobby, Michael's, Amazon or CoastalScents as well as some of the ingredients. I prefer CoastalScents because they have everything in one place so I can make one order and they are much cheaper.


Happy Penny Pinching :)

Recipes and photos courtesy of Crunch Betty

Saturday, November 5, 2011

Penny Pinch Beauty Tip: Citrus Salt Body Scrub


A wonderful exfoliant and full body moisturizer for use in the shower. Leave a jar near your outdoor shower at the beach to add a healthy glow to dull dry skin.

Ingredients Add to grocery list

1/2 cup sea salt
1/2 cup sweet almond oil
(can substitute light olive oil or vegetable oil)
1/2 teaspoon lemon zest
1/2 teaspoon orange zest

Directions

In a medium dry bowl, combine all ingredients making sure to not let any water touch them as it will dissolve the salt. Pour mixture into an airtight container and store in a cool dry place.
To use: Just before showering, swirl ingredients together with your fingertips to mix. Clean body completely and just before exiting shower, apply Citrus Salt Body Scrub to body in a firm circular scrubbing motion with hands or a soft washcloth. Rinse off the mixture and pat body dry with a clean towel.

Tools You May Need

Mixing bowls

Recipe Courtesy of Paula Deen

Monday, October 31, 2011

Penny Pinch Beauty Tips: Homemade Facewash-The Oil Cleansing Method


A few months ago, I decided I wanted to try homemade cleaning and beauty products.
I started small, by replacing a few of my cleaning products with vinegar {I’ll talk more about this later}. Then I started using vinegar and safety pins as an alternative to fabric softener.
However, the one homemade product I’m most excited about is my homemade face wash.

The Oil Cleansing Method.

Yup, we’re washing our face with oil — which I know sounds absolutely ridiculous. But believe it or not, my skin has never looked better!
I did a bit of research and found that traditional cleansers strip skin of its natural oils, leaving it tight and dry {which is why I had to slather lotion on my face at least 4 times a day}.
However, the oil cleansing method uses caster oil to cleans the skin, and sunflower oil or olive oil to moisturize the skin; resulting in soft, glowing skin without the need for extra lotions or products. {I’m not a dermatologist, but if you’re interested, you can read all about the Oil Cleansing Method here.}
Don’t worry, it’s REALLY simple to make, and practically free!

Ingredients:

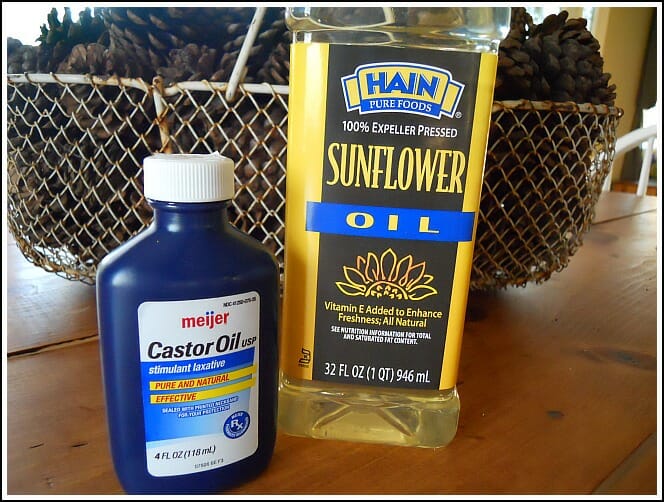
1. Caster Oil — found in the laxative section of your grocery store
2. Sunflower Oil or Olive Oil – we’re using sunflower oil
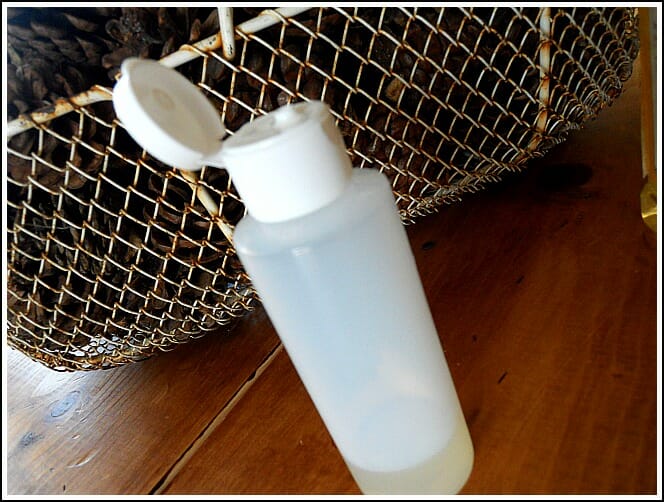
3. A small plastic bottle with tight sealing cap – I found mine in the travel-size section for 89 cents
4. A soft washcloth


Making the Oil Cleansing Face Wash

Mix the two oils in a small, flip-top plastic bottle according to your skin type.
NORMAL SKIN: Mix one-part caster oil with one-part sunflower oil.
OILY SKIN: Mix two or three-parts caster oil with one-part sunflower oil.
DRY SKIN: Mix one-part caster oil with two or three-parts sunflower oil.

Using the Oil Cleansing Method

  • Pour a quarter-size amount of the oil mixture into your hand
  • Gently massage the oil into your skin for about one minute
  • Run a clean washcloth under very warm water
  • Lay washcloth over your face and let it sit for another minute – this is key to “steaming” the impurities out of your pores
  • Rinse washcloth and gently rub the remaining oil, dirt, make-up, and residue off your face
  • Repeat rinsing if necessary
  • Enjoy really smooth and moisturized skin with out the need for lotion!

Why I LOVE the Oil Cleansing Method.

1. It’s really inexpensive. If you already have sunflower oil or olive oil in the house, your total expense will probably be less than $3.00. And you’ll be able to make enough face wash to last you for many months!
2. It removes make up. The oils naturally remove makeup, so you won’t need to buy pricey makeup removers anymore.
3. It’s SO moisturizing. Dave and I have been using this method for almost a month now and have only used face lotion a few times {compare to multiple times every day}.
4. I feel like I’m at the spa. When I have the hot washcloth on my face, steaming my pore, it feels like a mini facial.
5. I only have to wash my face once per day. I use the oil cleansing method at night, when I’m in the shower. Then in the morning, I simply splash warm water on my face.
6. It’s all natural. Even though I’m still not a hard-core “green” gal, I do think it’s important to reduce the amount of chemicals we put into our bodies and on our skin. So I love that I’m using a product that are safe to eat!
7. It makes my skin feel so soft. Like I said earlier, my skin has never looked better — and this is reason enough for me!!

Originally posted by Andrea 2/23/2011
Saturday, October 29, 2011

Halloween 2011: Totally AWESOME 80's Katy Perry Look

Had a great time creating this look for my daughter this Halloween. She wanted to go as the Katy Perry from the music video "Last Friday Night T.G.I.F". I think we came pretty close to the original.


BEFORE

AFTER

THIS ONE SHOWS THE SHIMMER

CLOSED EYE
FULL FACE


KATY PERRY LOOK

Wednesday, October 26, 2011

Penny Pinch Beauty Tips-Face Primers

Makeup primer is a wonderful prep product before applying your foundation. Most primers such as Smashbox Photo Finish Primer ($36.00), create a smooth surface for it to glide onto. Below are great alternatives to top of the line makeup primers for the Penny Pinch Beauty Gal.
  
Powder-Gel
  • The Monistat Soothing Care Chafing Relief Powder-Gel is said to have similar ingredients as Smashbox Photo Finish, a top makeup primer product. Use the Monistat Chafing Gel just as you would a makeup primer. Smashbox Photo Finish claims to reduce the appearance of pores, smooth fine lines, fill imperfections and create a clean canvas for makeup. Users of the Monistat Soothing Care Chafing Relief Powder-Gel say that it does the same.

     Can be found at most drug stores, Wal-Mart, Target or at Amazon Retail $5.00 approx.

Dermalogica Barrier Repair

  • Dermalogica Barrier Repair can be used as an alternative to makeup primer as well. You can use Barrier Repair as a waterless moisturizer as well as a makeup primer. A popular ingredient in makeup primers, silicone, is also in the Dermalogica Barrier Repair. Use the Barrier Repair on a clean, dry face before applying makeup

Can be found here at Amazon retails for $24.50
 
Look for the Next Penny Pinch Beauty Tip: Setting Sprays

Tuesday, October 25, 2011

Penny Pinch Beauty Tip-DIY Surf Spray

If any of you have tried the Bumble and Bumble Surf Spray or Aquage Sea Salt Spray  you know why I’m raving about its amazing ability to create gorgeous, beach-ready hair.  Although it has some sort of magic powers creating glorious curls, it will cost you quite a few pretty pennies. One bottle of Bumble and Bumble Surf Spray costs around $27 depending on where you purchase it. Seeing as there are very rarely coupons for this product, there has to be another way to have beautiful, wavy hair and still keep your $27.


Thank goodness for a DIY version of this Surf Spray. Simple ingredients that cost very little!
  • Epsom salt – These can be found relatively anywhere. I used the more finely ground stuff because it mixes easier and faster with the water. Retail cost around $2.18 
  • Hair gel – There are always great deals on hair styling products, including gel. (Infusium 23, Dove Hair Care and Garnier Fructis all have styling products on sale with coupons.You can also go to BigLots)
  • Water  – Try distilled or filtered water, it works the best!
  • Coconut scented conditioner - It doesn't have to be expensive conditioner - I used Suave brand for $1 at the dollar store. I mostly added this for the "beachy" scent BUT it helps counteract the drying that the salt will cause. 
  • Spray bottleIf you have one already kudos to you Otherwise you can find them super cheap at dollar stores, BigLots or any discount store. Make sure its 8 fl. oz. - 10 fl. oz. is better, you will need the extra room for shaking.
Creating this spray is extremely simple. Combine the following mixture into the spray bottle:
  • 1-2 teaspoons Epsom salt
  • 1-2 large squirts of hair gel
  • 1/2 tsp of conditioner-use more if you have extra dry hair
  • 4 ounces water
Once you have all of the ingredients inside the spray bottle, shake it up well and voilà,


OPTIONAL ADD-INS:
  • Essential oils: If you have dry or coarse hair, this is a good add-in. They will help condition your hair and add some shine. Choose whatever scent you want - ylang ylang works great for sensitive skin and problem scalps. Rosemary is great to help deepen the color of brunette's hair and chamomile brightens blonds. Use 3-5 drops.
  • Tea Tree Oil: Great for sensitive and oily scalps. If you have oilier hair, this is the best oil to add for you since it won't make your hair oilier or weigh it down. Use 3-5 drops.
  • More sea salt: You can add a little more if you have oilier/thicker hair. The more salt you use, the more it will dry out your hair. BUT the more you use, the "beachier" your hair will look and the more hold there will be. If the recipe doesn't have enough salt for you, add 1/4 tsp at a time until you reach the desired level. Make sure to record your changes so you know how much to add when you want to make more!
  • Lemon or lime juice: This will add a slight citrus-y scent as well as some extra hold. If you don't want to lighten your hair, don't use this! By adding this and going out in the sun, you could lighten your hair. Add a Tbsp at a time and be careful - too much and it will be sticky!
  • Hairspray: If you tried the spray and it STILL doesn't have enough hold for you, try adding some of your favorite non-aerosol hairspray to the mix. To keep the "beachy" look, you should use an invisible hold spray. If you don't care about that, use whatever spray you want. Just remember that the whole point of this spray is to cause a beachy, messy, undone sort of vibe. If you don't want that, maybe this isn't for you.
  • Rubbing alcohol: Several online recipes suggest adding this. If you add lemon juice, you will need to add about 1 tsp to preserve freshness. If you have oilier hair, adding this is fine (even without the lemon juice) it will help the other ingredients dry faster and it will help with hold. Just don't add too much or else you'll smell like rubbing alcohol! You can also try vodka (if you're over 21). The scent isn't as overpowering and you can use a little more of it. 
Styling Tips, Tricks, and Ideas

Spray it on when the hair is damp. Blow dry it with a diffuser until hair was fully dry. Then lightly mist it again with the spray and muss it a bit to add more texture. When you add the product and then blowdry, it adds TONS of volume. When you mist the product on dry hair, you add more texture with a firmer hold.

If you're just looking mainly for volume, I would mist this on damp hair, flip head upside down, and blowdry.

If you want the whole "beachy" hair look, mist on damp hair, scrunch, and let air-dry or blowdry with a diffuser. You can even wind dry strands around a large barrel curling iron to add more waves - just don't use the clamp on the iron!


Hope this saves you money and helps you be more beautiful!


Penny Pinch Beauty Tip-Don't Miss Deal e.l.f Cosmetics


This is a great deal from E.L.F Cosmetics on Living Social. I LOVE E.L.F products they are good high quality cosmetics for a fraction of the cost of other brands you would find at retailers like Sephora. I utilized this deal when they had it a few weeks ago and stocked up on product. To get yours click here.


DETAILS:
Limit one per person, additional as gifts • Limit one per transaction - may not combine vouchers • Valid online only • Valid on Studio or Mineral lines only • Entire value must be used in a single transaction • Shipping is not included • Other conditions apply • PROMOTIONAL VALUE EXPIRES ON October 27, 2012

New Series: Penny Pinch Beauty Tips


In today's world everyone seems to be on a budget and looking for ways to save money.  For women that can be even more difficult because of our beauty products. In this new series I will discuss alternatives to everyday products we use. To start this series off I thought I would talk about EYE MAKEUP REMOVERS. I for years spent TONS of money on the top of the line products from Benefit to Too Faced. I have also tried drug store brands such as REVLON and NEUTROGENA. All are wonderful products but take a good hit to my wallet and if you are like me these products doesn't last very long due to daily use. So below are alternatives that you can use in place of your eye makeup removers on a temporary or permanent basis.

EYE MAKEUP REMOVER ALTERNATIVES:

BABY OIL


This is a great way to remove cream concealers and waterproof mascara. I prefer the Johnson and Johnson brand but any brand will do. Please make sure you get the unscented and you dont need your eyes smelling like lavender. Johnson's Baby Oil $4.22 20-fl oz but coupons are always available( trust me I have tons of them) Equate (Wal-Mart Brand) $2.42-20 fl oz


BABY WASH


If you have seasonal allergies like I do and wake up with puffy, sticky and water eyes  then use baby wash. It will not only remove the eye makeup but also remove all the allergens on your eye lashes. I prefer the natural brands such as Burts Bees,$6.97-8 fl or Avenno Baby Soothing Cream Relief-12 fl oz $5.94 but any mild unscented or lightly scented wash will do...and yes coupons are available for these also.

Coupon Tip. 
I have been dubbed the "Coupon Ninja" by my husband. To get more savings on the above products find coupons at coupons.com, redplum.com or smartsource.com. Also try the manufactures websites and your local Sunday papers. The best way to safe more money is to purchase these from a store that is having a sale on them. Typically Target is great for having discounts or even BOGO or BOGO-50% on baby products. They even have store coupons that you can use with manufacture coupons. So happy hunting!

I hope this helps you safe money and look great!


Till Then
Amanda :)

Wednesday, October 12, 2011

Breast Cancer Awareness Look-Pretty in Pink

This is dedicated to all those affected by this horrible disease.
Please like my FACEBOOK page because if you do I will donate $1.00 for each person, in the month of October, to the 
Susan G. Komen Fund!


FACE
MAC Prep+Prime 
Revlon Colorstay Foundation-150 Buff Chamois
Sonia Kashuk Concealer Palette
Rimmel Stay Matte Pressed Powder-Sandstorm
Mac Fix+ Setting Spray

Eyes
Urban Decay Eyeshadow Primer Potion-Purple Bottle
Bare Minerals Rosy Outlook Blush(Outer Crease and "V", Lower Outer Lash Line)*
Sephora Palette 5th Row/3rd Down Light Pink (Inner Crease and "V", Inner Lower Lash Line)*
Sephora Palette 2nd Row/1st Color (Upper Brow/Tear Duct)
Bare Minerals Queen Phyllis (Lid)
Bare Minerals Big and Bright Eyeliner-Charcoal (Upper/Lower Lash and Upper Waterline)

Cheeks
E.L.F Golden Bronze

Lips
E.L.F Lipstick-Classy
E.L.F Shimmer Gloss-Pink

I used a variety of different brands to create this look. 
From Top of the Line to Drug Store Brands. 
I believe that it doesnt take TONS of money to create a gorgeous look. I hope you enjoy this.
If you would please leave any questions or comments.


Sunday, October 9, 2011

Pink Lilly Eyes


This happens to be one of my favorite flowers. I came across a tutorial online and took it and slightly modified the look. Hope you enjoy.


I adjusted the camera setting so you could vividly see the colors

 
Indoor Picture

Outside Lighting

Inside Lighting


Colors Used

Urban Decay Eyeshadow Primer
Creamy Eye Shadow Pencil All Over the Eye (Nyx or Rimmel)
Sephora Eye Palette (Sephora)
   White Matte Shadow (Lid/Brow)
    Dark Vibrant Pink (Corner/Inner Crease)
    Dark Purple/Lavender (Outer V/Upper Crease)
    Canary Yellow (Tear Duct) Hard to see in the picture its circled but its on the last row of the left side half and the 4th one down
Mac Black Gel Liner (upper lash line)
White Rimmel Eye Liner (lower water line) *optional, I didn't use it for this tutorial


Brushes are the key to this look I used the following type brushes( I will be have a tutorial on those shortly)


Stiff Dome Brush
Fluffy Dome Brush
Pencil Brush
Flat Shadow Brush
Bent Eyeliner Brush

I love the way this turned out, as well as my husband, it was so much fun to do...it does take some practice getting the colors blended right and the line straight. My eyes unfortunately like to naturally crease so I can't always get the eye liner to be exactly straight.

Smoky Purple Eye


For this look I used the following
Urban Decay Eyeshadow Primer Potion
Sephora Makeup Palette (see photo below for the colors)
Bare Minerals-Silver Lining
Bare Minerals Brunette Brow Colors
 Maybelline Falsies Mascara-New Black
E.L.F Gel Liner